Skip to content

How To Grow Cucumbers in Your Florida Garden

A Step-by-Step Guide for Beginners

Close Up of Baby Cucumbers

Introduction

Welcome to the lush world of Florida gardening, where the sun shines bright, and you can embark on your journey at any time.

Today, we'll embark on a journey to grow crisp and tasty cucumbers in your backyard.

Whether you're a newbie or just looking to refine your gardening skills, this step-by-step guide is here to help you cultivate the perfect cucumber crop.

Choosing the Best Cucumber Varieties for Florida Gardens

Florida Approved Cucumber Varieties:

Start by selecting cucumber varieties that thrive in Florida's warm climate. Opt for heat-tolerant and disease-resistant types, such as:

Marketmore

  • This variety is a reliable choice for your home garden as it is disease-resistant and has excellent flavor

Straight Eight

  • This popular variety has a crisp texture, straight shape and is well-suited for slicing or pickling

Diva

  • This is another top variety choice known for its sweet taste, tender skin, and ability to excel in warm climates

Giving Your Seedlings Their Best Chance

It is often best to start cucumber seedlings indoors.

Our winters are usually pretty mild, so if you plan to start your seedlings a few weeks before the last frost, they will be ready to go after the risk of frost has ended.

But, what is this last frost you speak of?

Great News!

We calculate last frost by using historical weather data, and your zip code.

For Florida, a general timeline for the last risk of frost for each region is shown below:

Region of FloridaLast Risk of Frost
NorthEarly April
CentralEarly March
SouthEarly February

How Do I Know Which Region I Am Located In?

Don't worry, we got you!

This nifty map from the UF IFAS Extension should give you an idea of the Florida region you are located in.

Florida Gardening Zones

Now that we know our region and average last frost dates, we can determine when we want to start our seedlings indoors.

For the cucumber varieties we suggested above, about 4 weeks before the last risk of frost is a good time to start our seedlings in their soil blocks indoors. ❄️

Starting Your Seedlings Indoors

Alright, now it's time to have some fun!

Have fun. Eliminate uncertainty.

  1. First, we need to get our growing mix ready.

Organic Seed Starting Mix

  1. Then, we want to prepare our seed-growing trays.
    • The one Gardeners sells here is a nice one. It comes with a self-water reservoir and a capillary mat that soaks the water up from the reservoir so the soil can absorb it from the mat through the hole in the bottom of each cell.

Seed Starting Kit

  1. Next, it is time to sow our seeds!
    • Fill up each cell in your tray with the growing mix. Make 2 little holes with your finger for each cell. For cucumbers, this is roughly 1/4 inch to 1/2 inch deep. Drop a seed into each hole for a total of 2 per cell. We are going to trim the weaker one in a week or so to let the stronger plant develop. Cover the seeds with some leftover growing mix and give them a quick drink of water.
  2. Finally, it is time to set these babies on the window sill.
    • If you are using the Gardeners seed starter kit, it comes with a cover to keep moisture inside to create a greenhouse effect and promote germination. Pop that sucker on and place the entire tray, with the reservoir that has a cup of water in it, on a window sill or in an area that gets 8+ hours of direct sunlight if possible.
  3. Check-in time!
    • A few days, or maybe a week later check in on your seedling starts. You should start to see the first set of leaves forming, called seed leaves. Perfect! You can now remove the cover and set it aside, we no longer need it as now these seedling starts want as much sunlight as they can get. At this time you might need to fill the reservoir with another cup of water so the soil blocks continue to absorb water from the mat.
  4. Keep an eye on these bad boys.
    • It's ok to use your hands. Touch the soil every couple of days. It should feel like a well-rung-out sponge. If you press the soil and it is soggy, no worries, just remove the tray from the mat for a few days so it dries out a bit, then move it back.

The difference between seed leaves and true leaves

  1. Trim the weaker one.
    • Once you start to see true leaves form, not the first seed leaves, but the ones that follow, you can trim the weaker Cucumber from the same cell to promote the growth of the stronger one. Just simply cut the stem at the soil level and leave the bigger one to flourish.

Great job! In a few weeks, we will be ready to prepare our soil and transplant these cucumbers to their home where they will grow up and start producing fruit for us. 🥒

Check out the video for watering and pruning your seedlings starts

Building the Best Soil Mixture for Your Cucumbers

In Florida, you cannot use the soil that is in the ground because it is too sandy, so we need to mix our own. There are many ways to do this, but the combination below has worked well for me.

Check out the video for preparing soil for containers

⚠️ Note for using peat moss

When peat moss gets dry, it tends to stay that way. It also gets very hard and does not allow water to soak into the soil very well.

To combat this, either continue to keep the soil moist, but not waterlogged. This means that you should be able to put your finger into the soil about 2 inches deep and it should feel damp, not crumbly and dry.

If you find that your peat moss soil mixture has turned hard and is not absorbing water, have no fear!

All you need to do is fill a container larger than the 5-gallon grow bag with water and place the grow bag in the water.

Do not let the water spill over the top, but instead let the grow bag soak the water in through the sides.

Let the grow bag sit in the container filled with water for about 20 minutes.

You can then remove the grow bag and place it back on your patio, or wherever you had it before, so it gets 6+ hours of sun and you should be all set. ☀️

Preparing to Transplant Your Seedling Starts

Before we dive into the transplanting process, we need to discuss transplant shock. Some small plants get stressed out when moving to another home, but we have a strategy to help them out.

This strategy is called "hardening off".

We gradually introduce our seedlings from a protected indoor environment to the harsher outdoor conditions that fluctuate in temperate, wind, and full sun exposure.

For cucumbers, in week 3, about a week before we are going to transplant them, do the following each day:

  • Day 1
    • Place the entire tray with the seedling starts outside. This can be on the patio or an area that gets 6+ hours of direct sunlight a day, but for the first day, only keep these little guys outside for a couple of hours in the morning.
  • Day 2
    • Do the same thing, but increase the amount of time there are outside by a couple of hours.
  • Day 3 through 7
    • Continue this trend, adding a couple of hours each day, until you are leaving the seedling starts outside for the entire day

This will buff them up and help reduce transplant shock.

After the 7th day, you are ready to transplant! 🙌

Transplanting Your Seedling Starts Into Containers

Check out the video for transplanting your seedling starts

We are not ready to get these little guys into their forever home.

Dig a small hole in the center of your grow bag with the soil we prepared earlier.

This hole should be just deep enough so the bottom leaves are not touching the soil after transplanting.

It's okay to measure twice and plant once. 😉

Before you place the seedling in the hole, grab a small handful of granular fertilizer, such as this all-purpose organic fertilizer, and place that in the bottom of the hole we just dug.

All-Purpose Organic Fertilizer

Give the fertilizer a quick drink to get everything activated.

Then place your seedling in the hole, right on top of the wet fertilizer.

It is OK to give the soil block a gentle squeeze to loosen up the roots, but don't squeeze too hard and break it apart.

Fill in the hole with the soil we moved to the side and give it a firm, but gentle press down to make our seedlings feel comfortable in their new home.

Next, give the soil a good drink so the soil absorbs the water to stay moist.

Sometimes the grow bags will leak excess water and that is just fine, they are doing their job.

Our soil combination helps keep the soil moist, but not soggy, by improving drainage from the perlite.

Before we are done, we want to set our soil up for success in the strong Florida sun. We do this by adding a layer of mulch on top of our soil to help retain the moisture during the day.

This is the mulch I use, from Home Depot, but you can use any mulch you want, or dry leaves if you have some lying around. 🍂

Cypress Blend Mulch

Supporting Cucumber Growth in Your Florida Garden

Now that we have our cucumber plant in its new home and growing, it will need some support.

It is most common to use some form of trellis.

My favorite is the tunnel trellis.

The way that has worked for me is to get some wire garden fence from a store like Tractor Supply and it looks like this.

Wire Garden Fence

This is useful if you have some containers you can space about 4 feet apart and make an arch between them so it looks like a tunnel.

A rough estimate would be this wire garden fence should be 4 feet wide by 20 feet long to make an arch you can walk under.

You can then get some rebar, PVC, or T-Posts to create a vertical support for the tunnel trellis.

If you decide to use a T-post, like the one below, then you want to ensure you secure it at least 1 foot into the ground.

A 6-foot T-Post should do the trick. You would need 4 of them, one for each corner.

That is the end with the anchor plate. White tip is the top side.

Studded T-Post

Starting on one side, set the end of the wire garden fence at the base of 2 T-Posts and zip tie them together every few feet.

The arch will start to farm and come down the other side to the base of the other 2 T-Posts.

Zip tie everything together and stand back to observe your beautiful tunnel trellis, ready for your cucumber plants to climb up.

Cucumber Climbing Up Trellis

Every week or so, you can train the cucumber nodes to go through the wire fence and the tendrils will start to latch on, guiding the plant up and over the tunnel trellis.

Pruning and Caring for Your Cucumbers

Cucumbers grow as vines and have a few different parts which are important to note.

  • Main Stem
  • Sun Leaves
  • Suckers
  • Tendrils
  • Male Flowers
  • Female Flowers

Cucumber Plant and its Parts

With this information, we have a clear understanding of what to prune, what to leave untouched, and what aspects to monitor for effective maintenance, disease prevention, pest control, and fostering fruit development.

Let's Talk About Each of Those Things

Pruning Nodes and Suckers

As seen in the image above, the main stem grows a sun leaf, tendril, sucker, and male/female flowers. This is called a node.

Every 6 to 8 inches a new node will form. This can happen very fast for cucumber plants and every few days a new one could form.

From a new node, a sucker will eventually turn into another main stem, create more nodes, and so on until the cucumber plant completely takes over.

We don't want that.

So, we will do the following to keep it under control.

  1. As the cucumber plant makes its way up the trellis, trim the 3 lowest nodes(sucker, sun leaf, tendril ... everything), but do not cut the main stem. This will improve airflow and keep the sun leaves from drooping into the soil(which can cause disease).
  2. Prune those suckers! From the 4th node and above, as soon as you see the suckers start to form from the node, trim as close to the main stem as you can without clipping the other parts of the node.

❗ Remember

When pruning, you never want to trim more than 30% of the plant. So after a few snips, set those clippers down for another day.

Proper Care & Preservation

Keep an eye out for dying or damaged leaves.

Sometimes the large sun leaves will shade other ones, causing the leaves that are not getting enough sun to wilt.

No worries. Just trim the ones getting blocked as close to the main stem as possible.

Normally, when leaves start to turn yellow, the plant needs more water and when they turn brown, they have too much water.

With these tips, you will increase the longevity of your cucumber plant and promote new growth.

Disease Prevention

I have been lucky down here in South Florida.

Not many of my cucumber plants have had any diseases, but there are a few precautionary steps we can take to be proactive in preventing diseases and their spread.

  • Water at the base of the plant so the leaves do not get wet
  • Prune appropriately as mentioned above which will keep the leaves off of the soil which is the leading cause of disease
  • When pruning or inspecting your cucumber plants, do so with dry hands and when the leaves are dry. Handling leaves when they are wet or after touching other plants can transfer disease very easily.

Pest Control

The most common pest you will encounter on your cucumber plants is the pickleworm.

This bad boy.

Cucumber Pests - Pickleworm

These little guys come from moths that lay eggs during the night.

They then hatch into larvae and feast on the leaves of your cucumber plant.

They usually live on the underside of the leaves, making them hard to stop. Unless of course, your leaves have holes in them and droppings all over like this.

Cucumber Pests - Pickleworm Droppings

A couple of ways to combat these little fellas.

You can check the under-side of your leaves every day or two and manually pick these off so your cucumber leaves do not get ravaged.

You can also use a BT Solution like this one from Amazon which is specialized for organic gardening.

BT Spray for Organic Gardening

Spray it on the top and bottom side of the leaves, every other week, to repel pickleworms and the moths that lay the eggs.

Watering & Fertilizing Your Cucumber Plants

Watering Schedule

Cucumber plants require about 1 gallon of water per week.

To keep things balanced, I usually water 1/3 of a gallon per cucumber plant every other day.

This usually keeps the soil at a moisture the plant enjoys, allows me to check in every couple of days, and work my fertilizing schedule into my watering schedule.

Different Types of Fertilizers

Liquid and granular fertilizers are the two ways we can fertilize our plants.

Both of these are done at different times throughout the growing process.

Let's discuss what each of them does, their benefits, and how frequently to apply them.

Liquid Fertilizer

The benefit of liquid fertilizer is that it is fast-release.

With the Organic Liquid Nutrient Trio Formula from Fox Farm, you can get nutrients to the soil and plant roots very quickly.

Fox Farm Fertilizer for Cucumber Plants

These are concentrates, so you will need to mix them with water and follow their recommended schedule.

And here is the schedule. Let's break it down.

Fox Farm Soil Feeding Fertilizer Schedule

The week before 1, seedlings and cuttings, you can't start right after you transplant your seedlings into your container or garden bed.

It says 18 hours a day, but unless you are growing indoors with lights, I am not sure how else you are going to get that, so we can just use the 8+ hours of outdoor sun a day we have access to.

Since cucumber plants require about 1 gallon of water per week, I schedule a day of the week to fertilize my plants.

Usually, this is Fertilizer Friday. 😜

For every 3 cucumber plants I have, I will mix 1 gallon of water with the recommended combination measurements of Big Bloom, Grow Big and Tiger Bloom.

Week 3 Example:

  • 6 teaspoons of Big Bloom
  • 3 teaspoons of Grow Big

Fill a 1-gallon water jug about half way.

Add in each of the liquid fertilizers.

Fill up the 1 gallon water jug to the top so everything is mixed well.

With the 1 gallon of mixed liquid fertilizer solution, I will split this between 3 plants.

That way, each plant gets 1/3 of its weekly watering and the weekly liquid nutrients it needs.

This also allows me to space out my watering, so every other day I can give them a drink of another 1/3 gallon, roughly totaling 1 gallon per cucumber plant each week.

Granular Fertilizer

There are a couple of ways to go about adding granular fertilizer.

It usually depends on the current state of your soil, considering PH level and the nutrients the plant needs.

Using Compost

This Black Kow Compost from Home Depot works well.

Black Kow Compost

All you need to do is add a thin layer, about an inch, on top of your soil and water it in.

Do this once every 4 weeks for a gentle, slow release of nutrients into your soil.

In my experience, this compliments the Fox Farm liquid fertilizer schedule very well.

Using All-Purpose Fertilizer

If you don't want to use Black Kow or find that your soil requires some more nutrients, this all-purpose organic fertilizer is also a great option.

Sprinkle 1 handful of the granular fertilizer for each plant, once every 4 weeks, for that slow release of nutrients.

Be sure to give the plant a good drink to activate the fertilizer and start the absorption process.

All-Purpose Organic Fertilizer

Harvesting Your Cucumber Plants

About 10 weeks have passed since you have transplanted your cucumber plants into your container or garden bed.

They have crawled up your trellis and the nodes have started to produce fruit.

The time to maturity, color and shape will vary depending on the variety you chose to grow.

For the ones we recommended, Marketmore and Straight Eight, your cucumbers should have a long, slender, dark green color.

This means they are ready to be harvested by clipping the stem that connects the fruit to the node.

Be sure not to cut any other part as this will hinder additional growth.

Give them a good wash and enjoy in salads or pickle them for later use.

Last Updated:

Brandon Franklin

Brandon Franklin

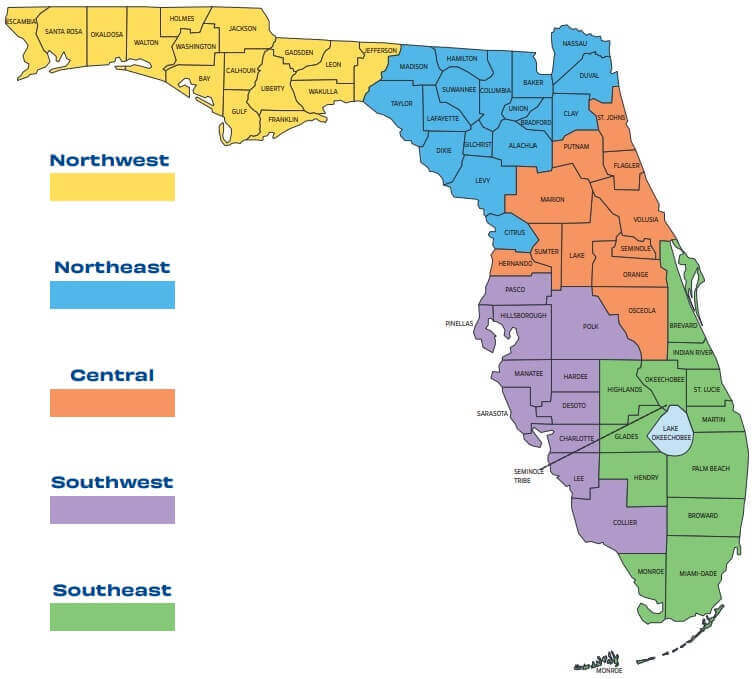
Howdy! My name is Brandon, but my boys call me BFrank. I was born and raised in South Florida. Years ago I discovered gardening because I wanted to have more control over the food my family consumed at home and reduce our reliability on the supermarket. @ Meet the Gardener